| Photocopying rare, expensive pulp magazines without damaging them
is a real challenge. Pulps are generally so brittle that opening the
magazine and stretching out its pages flat enough to get a good photocopy
will generally break the spine, crease the page, or (as happened to
me) the page might 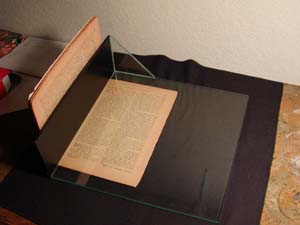 break
off from the magazine and crumble into bits and pieces. Another problem
with photocopying pulps is that often the pulp’s pages are so
brown due to age that it’s very difficult to make a clean photocopy
of the text that doesn’t result in one big black page of toner.
Any way you look at it, photocopying pulps can be a risky, often frustrating
problem. break
off from the magazine and crumble into bits and pieces. Another problem
with photocopying pulps is that often the pulp’s pages are so
brown due to age that it’s very difficult to make a clean photocopy
of the text that doesn’t result in one big black page of toner.
Any way you look at it, photocopying pulps can be a risky, often frustrating
problem.
One possible solution could be to seek out and find a “book edge
copier.” These are specially designed photocopying machines used
to photocopy books and magazines. Generally, a book edge copier is a
photocopy machine that has a special angled glass that will allow the
book to be about 2/3rds open so that you don’t have to lay the
book flat and press against the spine. Whereas this would do well for
most books, the spines and pages of brittle pulp magazines will still
break when opened to this 120 degree angle. Also, if the pulp is browned,
the contrast adjustments on the book edge copier will often result in
a page that is entirely black with toner and where the text is difficult
or impossible to see. And lastly, these book edge copiers are very difficult
to find. The best place to look would be in museums and universities,
but then there is a problem of getting access to them.
There is also another machine that is computer based that is designed
for the book to be opened face up, a digital camera is placed above
the book, and the pages are digitally scanned. This would seem like
a perfect solution except that most old pulp magazines don’t want
to remain open and flat. Also, to open the magazine enough for the camera
to scan it would result in many pulp’s spines breaking. A good
idea, but not good enough.
The solution to this problem is to create your own pulp photocopying
setup at home. This is what I did, and it’s working perfectly.
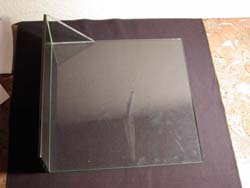 The
main part of this setup is a glass "book opener/holder." I
had a local glass shop make mine and it was about $25. It's 12"
x 12", and has a 12" long x 4" high vertical "side"
that I spray pained a flat black to stop light from bouncing off it
and casting reflections. There is one small glass triangle to reinforce
the bonding of the two pieces. The whole thing is made out of 3/16th
inch glass. If I were to make it again, I'd use a slightly thinner glass
for the "side" (maybe 1/8th"), and use a clear type of
glass called "starfire glass." The glass I used has a slightly
green tinge to it, but really it doesn't seem to interfere. Starfire
glass would just be nice, not necessary, but it's also 5 times more
expensive. The only other modification I would make would be to use
some sort of different brace for reinforcement that wouldn't get in
the way of lighting. The way I have it, the small triangle casts a shadow
if I light the pulp from the same direction. As it turns out, it really
is best to light the pulp with at least two lamps to even out the shadows
and light intensity. That said, my setup is working pretty well. The
main part of this setup is a glass "book opener/holder." I
had a local glass shop make mine and it was about $25. It's 12"
x 12", and has a 12" long x 4" high vertical "side"
that I spray pained a flat black to stop light from bouncing off it
and casting reflections. There is one small glass triangle to reinforce
the bonding of the two pieces. The whole thing is made out of 3/16th
inch glass. If I were to make it again, I'd use a slightly thinner glass
for the "side" (maybe 1/8th"), and use a clear type of
glass called "starfire glass." The glass I used has a slightly
green tinge to it, but really it doesn't seem to interfere. Starfire
glass would just be nice, not necessary, but it's also 5 times more
expensive. The only other modification I would make would be to use
some sort of different brace for reinforcement that wouldn't get in
the way of lighting. The way I have it, the small triangle casts a shadow
if I light the pulp from the same direction. As it turns out, it really
is best to light the pulp with at least two lamps to even out the shadows
and light intensity. That said, my setup is working pretty well.
The next thing you need is a digital camera. The choice of digital camera
is key. Although you can probably take really fine and detailed pictures
with any camera, it turns out that digitally editing and modifying the
images in Photoshop to get suitable images to print in black and white
is far too time consuming to bother with. Instead, I'm using a special
feature on my camera called "white board" which turns the
background white and any text black. This feature has become indespensible.
The manual states that this setting is good for taking pictures of things
on colored paper, and it works great on the browning paper of old pulps.
Using the “white board” setting doesn’t result in
the highest quality photos, but it's pretty darn close and, best of
all, fast. I also made sure my camera has an excellent optical zoom.
My zoom is 10x optical, and 27x digital (digital zoom is really just
cropping and enlarging and is not a true zoom). The zoom comes in handy
when I want to fill up the entire frame with the page (in other words
to frame the picture). The camera I bought is an Olympus C-700 Ultra
Zoom, and it was $600. I bought it because Olympus seems to have the
best optics for the money. However, you could probably find a suitable
camera for much less than I paid.
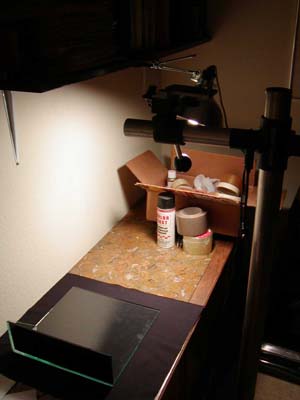
You also need something to mount the camera on and something to light
the pulps. The metal pole you see in the picture to the right is a used
studio camera mount I bought for $100. Its arm extends out over the
pulp and allows me to place the camera directly above the pulp to take
pictures. I made the light out of cheap materials found at the hardware
store. Again, not the best, but it does the job. The bulb is a normal
150 watt soft white bulb. It would be best to have two lights to try
to even out the light and balance the shadows.
 Using
the setup is fairly simple. Gently open the pulp and place the glass
opener on top of one side of the magazine. The vertical glass piece
will hold the pulp open without damaging it so you can take a picture.
When done, lift the glass holder up off the pulp and turn the pulp around
to take a picture of the other page, replacing the glass holder on top
of the pulp, and so on. You do not need to push the pulp flat up against
the side glass plate at a pure 90 degree angle in order to get a good
picture. There is usually enough space between the spine and the beginning
of the text to allow the pulp some space and bending room. But for smaller
magazines or booklets, such as the Little Blue Books (small 4"x3"
format), there isn't any space to give and they either have to be at
a 90 degree angle for all the text on the page to be seen or you have
to turn the glass holder around and keep the cover of the booklet open
with your other hand. This, however, does not apply to the larger pulps.
The pulp I showed in the picture is a beat up piece of junk, so I pushed
it up against the side glass plate. Just to be safe, I wouldn't have
done that with a normal pulp. There’s usually a good ½
inch of play there. Using
the setup is fairly simple. Gently open the pulp and place the glass
opener on top of one side of the magazine. The vertical glass piece
will hold the pulp open without damaging it so you can take a picture.
When done, lift the glass holder up off the pulp and turn the pulp around
to take a picture of the other page, replacing the glass holder on top
of the pulp, and so on. You do not need to push the pulp flat up against
the side glass plate at a pure 90 degree angle in order to get a good
picture. There is usually enough space between the spine and the beginning
of the text to allow the pulp some space and bending room. But for smaller
magazines or booklets, such as the Little Blue Books (small 4"x3"
format), there isn't any space to give and they either have to be at
a 90 degree angle for all the text on the page to be seen or you have
to turn the glass holder around and keep the cover of the booklet open
with your other hand. This, however, does not apply to the larger pulps.
The pulp I showed in the picture is a beat up piece of junk, so I pushed
it up against the side glass plate. Just to be safe, I wouldn't have
done that with a normal pulp. There’s usually a good ½
inch of play there.
Lastly, since you'll be taking photographs with a digital camera, you'll
need some good OCR software to scan the photographs and create the digital
text. Omnipage has been the leading software for years, but word is
that Abbyy Finereader is a fairly good OCR program as well. Make sure
that you convert the resolution or DPI of all digital photographs to
300 DPI or your OCR program will probably not be able to scan the photographs.
I hope this has given others here some ideas on how to get around the
problems of photocopying or duplicating old pulp magazines without damaging
them.
|